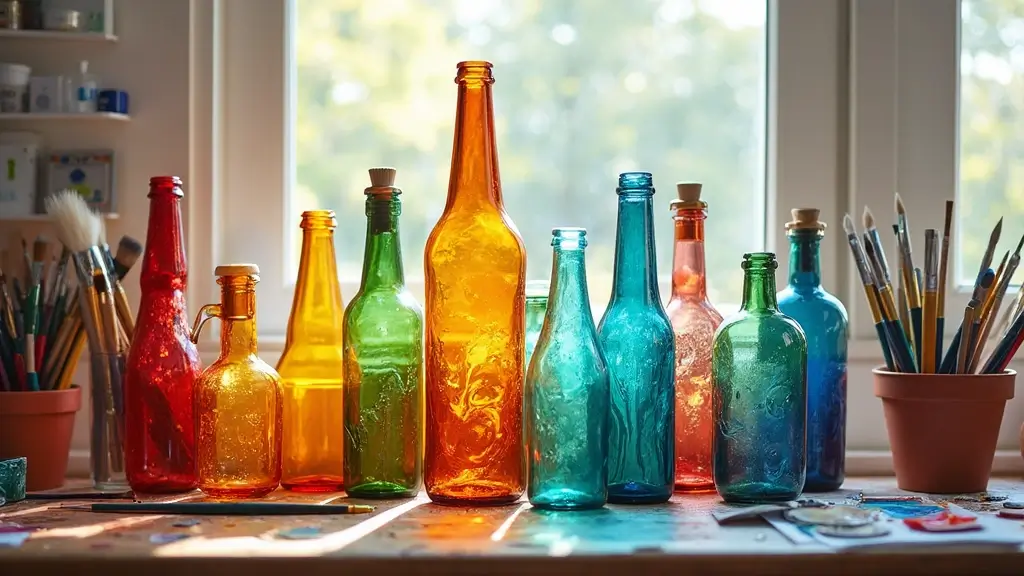
Have you ever looked at an empty bottle and wondered how to turn it into something beautiful? If so, you’re in the right place! I created this post because I want to inspire you to dive into the world of acrylic bottle painting. This creative outlet helps you transform ordinary bottles into unique pieces of art that can brighten up your home.
If you love DIY projects, home decor, or simply enjoy expressing your creativity, this one’s for you. Whether you’re a beginner or a seasoned artist, these ideas will spark your imagination. You don’t need to be a pro to create eye-catching designs that will impress your friends and family.
What can you expect from this collection? I’ve rounded up 25 fun and easy bottle painting ideas that are perfect for adding a personal touch to your space. Each idea is designed to help you unleash your creativity while making something special for your home. You’ll find tips on colors, styles, and techniques that make the process enjoyable and rewarding.
Best of all, painting bottles is not just a great way to spend your time; it also gives you a chance to create decor that reflects your style. Imagine the satisfaction of filling your shelves or tables with your own handmade pieces! So grab some bottles, acrylic paints, and brushes, and get ready to bring a splash of color into your life. Let’s jump into these ideas and start painting!
1. Ombre Effect Bottles

Create a striking ombre effect on your bottles to elevate your home decor! This beautiful technique blends two or more colors, giving your bottles a soft, elegant look that adds charm to any room. Imagine a serene transition from light blue at the top to deep navy at the bottom. You can find this style trending on platforms like Pinterest, where many love showcasing their creativity.
Begin by applying a base coat of your lightest color. Let it dry completely to ensure a smooth finish. Next, take your darker shade and mix it with a bit of the lighter color. Using a sponge or brush, blend the colors at the center of the bottle until you get that perfect gradient. For added protection, finish with a clear sealant.
Here are some practical tips to help you get started. This project is budget-friendly and allows you to personalize your space without overspending. You don’t have to stick to just two colors; feel free to experiment with three for a more dynamic effect. Group a few ombre bottles together on a shelf or table to create a cohesive display that draws the eye.
• Use colors that complement your home’s theme
• Choose two to three shades for a lively blend
• Pick bottles in different shapes for variety
• Place them together for a stunning visual impact
With these simple steps, your ombre bottles will not only look stunning but will also make your space feel inviting and uniquely yours. Dive into this fun DIY project and let your creativity shine!
Ombre Effect Bottles
Editor’s Choice

Acrylic Paint Set, 24 Colors (2 oz/Bottle) with 12 Art Brushes, Art Supp…

Rust-Oleum 249859 Painter’s Touch 2X Ultra Cover Spray Paint, Semi-Gloss…

24 Pcs Foam Paint Brushes, Wood Handle Sponge Brushes for Painting, Stai…
2. Floral Pattern Bottles

Unleash your creativity by painting beautiful floral patterns on your bottles! This project adds a personal touch to your home decor. You can choose bright acrylic paints to create eye-catching designs. Imagine delicate daisies in soft yellow and deep green leaves or bold red roses against a pale blue backdrop. These floral designs are trending on platforms like Pinterest, making your space feel fresh and inviting.
Start by lightly sketching your floral design on the bottle with a pencil. This step allows you to visualize your art without committing right away. After you finalize your design, use small brushes to fill in the flowers and leaves. Layer different shades to add depth and dimension. A glossy finish can really make those colors pop, giving your artwork a polished look.
To keep your project budget-friendly, consider using old bottles you already have at home. Thrift stores are also great places to find unique glassware that’s just waiting for a makeover. Pair your painted bottles with real flowers for a stunning centerpiece that brightens up any room. This combination not only elevates your decor but also creates a warm and inviting atmosphere.
• Use stencils for precise floral designs.
• Pick metallic paints for a glamorous touch.
• Place your bottles near natural light to enhance colors.
• Add fresh flowers for a lively centerpiece.
3. Geometric Designs

Geometric designs are a fantastic way to add a modern touch to your bottle art! These patterns are trendy and can transform simple bottles into stunning decor pieces. You can create sharp lines and unique shapes using painter’s tape. Choose two or three colors that contrast well, like a bold blue paired with a soft yellow. Picture a bottle with sections of these colors, each one separated by clean, crisp lines. This style is popular on platforms like Pinterest, where you’ll find countless inspirations showcasing these eye-catching designs.
Ready to get started? First, gather some affordable supplies. You only need painter’s tape, acrylic paints, and your chosen bottles. Tape off the sections on your bottle where you want the colors to go. After painting, allow the paint to dry completely before removing the tape; this ensures those sharp edges look professional. This technique works well with various shapes—triangles, squares, or even circles. The result? A personalized decor item that adds a pop of style to your home, making it feel fresh and inviting.
• Use painter’s tape for clean, sharp lines
• Choose contrasting colors for a striking effect
• Experiment with different geometric shapes
• Mix matte and gloss finishes for added texture
Embrace your creativity and let your bottles reflect your personal style!
Geometric Designs
Editor’s Choice

ScotchBlue Original Multi-Surface Painters Tape, 1 Inch Wide (0.94 In. x…
Acrylic Paint Set, 24 Colors (2 oz/Bottle) with 12 Art Brushes, Art Supp…

Mfacoy Set of 6 Glass Bottles, 12 oz Clear Liquor Bottles, Heavy Base Gl…
4. Chalkboard Paint Bottles

Transform ordinary bottles into stylish chalkboard canvases that add charm to your home! Using chalkboard paint lets you turn any bottle into a fun, functional decor piece. Imagine a sleek black bottle adorned with cheerful messages or seasonal quotes. You can easily customize these bottles for parties, kitchen organization, or even heartfelt gifts. This trendy idea is perfect for adding a playful touch, as seen in popular DIY projects on Pinterest.
To get started, clean your bottle thoroughly before applying a coat of chalkboard paint. Allow it to dry completely for the best results. You can find affordable chalkboard paint at craft stores or online. Once your bottle is ready, grab some colorful chalk and let your creativity flow! Write inspiring quotes, reminders, or even fun doodles. This approach not only beautifies your space but also keeps it organized, making it feel more inviting.
Here are some tips to enhance your chalkboard paint bottles:
Use vibrant colored chalk for a fun pop.
Seal with a clear spray to protect your artwork.
Change messages to reflect seasons or occasions.
Place them on shelves or tables for easy visibility.
With these simple steps, you’ll create personalized decor that everyone will admire. Enjoy the creative process and watch your home come to life with your unique touch!
Chalkboard Paint Bottles
Editor’s Choice

FolkArt FA2725 Multi-Surface Chalkboard Paint (16 Ounce), 2725 Black
5. Rustic Twine Wrap

Transform your space with a charming Rustic Twine Wrap for your bottles. This simple project brings a cozy, natural vibe to your home decor. Start with a bottle painted in warm, earthy shades like terracotta or olive green. These colors blend beautifully with twine, making your creation stand out. As seen on Pinterest, this look is perfect for both modern and traditional settings.
To make your rustic bottle wrap, first, apply a base coat of acrylic paint and let it dry completely. Next, grab some jute or twine and begin wrapping it around the neck and body of the bottle. Secure it with a dab of glue every few inches to keep it in place. This not only creates a beautiful vase but also serves as a striking decorative piece that adds warmth to your space.
• Choose natural jute or colored twine for a personal touch.
• Wrap tightly to create a clean, polished look.
• Add dried flowers or herbs to enhance the rustic charm.
• Mix twine types for a fun, textured effect.
This project is budget-friendly and lets you express your creativity. Whether you place it on a table or a shelf, it makes any corner feel more inviting and homey. So, gather your materials and start wrapping to bring a bit of rustic charm into your home!
Rustic Twine Wrap
Editor’s Choice
Acrylic Paint Set, 24 Colors (2 oz/Bottle) with 12 Art Brushes, Art Supp…

PerkHomy Natural Jute Twine 600 Feet Long Twine String for Crafts Gift W…

DIY Natural Dried Flower Set, Bulk Dried Flowers for Vase, Dried Flowers…
6. Metallic Finishes

Elevate your home decor with the stunning allure of metallic finishes on your painted bottles. Using shades like gold, silver, and copper can instantly add a touch of luxury to any space. Picture a shimmering gold bottle sitting on your mantle or a sleek silver one catching the light on your dining table. As seen on popular design sites, metallic accents are trending everywhere, adding glamour and sophistication to even the simplest setups.
To bring your metallic vision to life, start with a solid base coat that matches your metallic paint. This ensures an even finish and enhances the shine. You can use a sponge for a textured look or brush the paint on for a sleek, modern feel. If you’re on a budget, consider spray paints or acrylics from local craft stores; they are often affordable yet high-quality. This approach lets you create striking decor pieces that feel personalized and inviting, perfect for impressing your guests.
• Choose metallic colors like gold, silver, or copper for elegance.
• Use a sponge for a textured effect or a brush for sleekness.
• Group bottles together for a breathtaking centerpiece.
• Add fairy lights inside for a warm and magical ambiance.
With these tips, your metallic-painted bottles will shine brightly, making your home feel warm and inviting. They are not just decor items; they’re conversation starters that reflect your unique style. So grab your paints and let your creativity flow!
Metallic Finishes
Editor’s Choice

ARTEZA Metallic Acrylic Paint Set of 36 Colors, 0.74 ounce Tubes Non Tox…

Paint Sponge Applicator 3Pcs, Boyistar Black Detail Painting Sponge for …

Brightown 12 Pack LED Fairy Lights Battery Operated String Lights – 7ft …
7. Emoji Bottles

Bring a splash of joy to your home with emoji bottles! These quirky decorations can instantly uplift any space, making it feel more fun and inviting. Start by painting the entire bottle in a bright base color like sunny yellow or cheerful pink. Next, grab some black and yellow acrylic paint to sketch your favorite emojis. From classic smiley faces to silly expressions, the options are endless!
You can even create your own custom emojis to reflect your personality. This project is not only enjoyable for adults but also a hit with kids. Imagine their faces lighting up as they create their own unique designs!
To get started, gather some affordable glass or plastic bottles. You can find these at thrift stores or even use empty soda bottles. This DIY project is budget-friendly and allows you to express your creativity. Plus, emoji bottles can serve multiple purposes, like being colorful pencil holders or fun gifts for friends.
Making your space feel more personal and lively is easy with this idea. Your home will become a conversation starter, reflecting your playful side.
• Choose colorful bottles for a vibrant base
• Add unique emojis for a personal touch
• Use as pencil holders or quirky gifts
• Get kids involved for a fun family activity
8. Nature-Inspired Textures

Transform your bottles into stunning art pieces with nature-inspired textures! This technique brings the beauty of the outdoors right into your home. Think about creating patterns that mimic tree bark, leaves, or even rugged stones. Start with a light base coat to set the stage. Then, grab a sponge and dab on darker shades to add depth and interest. This method is perfect for rustic or bohemian styles, instantly creating a warm and organic atmosphere.
To make your nature-themed bottles shine, here are some practical tips. First, don’t hesitate to mix different textures on a single bottle. This adds complexity and makes your artwork truly unique. Second, consider using affordable materials like sponges and acrylic paints, which are easy to find at craft stores. You can even explore using leftover paints from past projects. The result? A cozy, inviting space that feels personal and artistic.
• Use sponges to create rich, layered textures
• Choose earthy tones for a natural vibe
• Pick bold colors for a modern twist
• Seal with a matte finish for an authentic look
With these tips, your nature-inspired bottles will enhance your decor and spark conversations. Enjoy the creative process and watch your home transform!
9. Whimsical Patterns

Let your imagination run wild with whimsical patterns on your painted bottles! Adding playful designs like polka dots, swirls, and zigzags can instantly uplift your home decor. Choose a bright base color, and then bring it to life with contrasting patterns. You might even try using more than one color for a joyful burst of energy. Pinterest is buzzing with these creative ideas, making them perfect for adding a splash of fun to any space.
To get started, gather some inexpensive bottles from your kitchen or local thrift store. You can use acrylic paints, which are budget-friendly and easy to work with. Don’t worry about perfection; the charm lies in their handmade feel. Consider mixing sizes and styles of dots or patterns to create visual interest. These whimsical bottles look amazing as centerpieces, especially when filled with fresh flowers. They can transform an ordinary table into a delightful conversation starter.
• Use a variety of colors to brighten your decor
• Choose contrasting shades for eye-catching patterns
• Add texture with sponges or brushes for unique effects
• Place them with flowers for an eclectic centerpiece
With these tips, you can create cheerful decor that feels personal and inviting. So, grab your paintbrush and let the fun begin!
Whimsical Patterns
Editor’s Choice

30 Pcs Round Sponges Brush Set, Round Sponge Brushes for Painting, Paint…
10. Sea-Inspired Bottles

Bring the beach to your home with charming sea-inspired painted bottles! Imagine bottles adorned in soothing shades of ocean blue, seafoam green, and soft sandy beige. Begin by applying a vibrant blue base coat, then use a sponge to create fun wave patterns or sandy textures.
For an extra touch, consider gluing small seashells or a sprinkle of real sand to your bottles. This coastal decor not only brightens your space but also sets a relaxed vibe, perfect for summer days or beach-themed gatherings. You might find inspiration from Pinterest, where these designs are trending among home decorators.
Ready to get started? Here are some practical tips for creating your own sea-inspired bottles without breaking the bank. Look for affordable glass bottles at thrift stores or even recycle your old ones. Choose acrylic paints as they are easy to work with and dry quickly. You can combine different ocean themes for a stunning display, allowing your creativity to shine through. These bottles will make your space feel inviting and fresh.
Tips:
– Use a sponge to create wave-like textures.
– Choose blue and green shades for a true ocean feel.
– Add real sand or seashells for a beachy touch.
– Group different designs for a visually appealing display.
11. Abstract Art Bottles

Transform your empty bottles into stunning abstract art that reflects your personality! Abstract art is all about freedom and expression. You can use bright colors, bold shapes, and even playful patterns. Pour paint directly on the bottles for swirls and drips, or use a brush to create spontaneous strokes. This unique approach allows you to capture your emotions, making each piece special.
Think about using colors that speak to you. Trending colors on platforms like Pinterest include deep blues and fiery oranges. You can place these bottles on a shelf, table, or even hang them for a modern art display. The beauty of abstract art is that there are no rules, so let your imagination run wild!
To get started, try these practical tips. Gather some affordable acrylic paints and experiment with layering colors for depth. You can find supplies at your local craft store without breaking the bank. If you’re looking for a fun project, consider making a series of bottles that tell a story or represent different moods. When displayed together, they create an eye-catching focal point in your home.
• Use bright colors for a bold statement
• Layer paints to add depth and texture
• Create a series for a cohesive look
• Hang bottles or place them on shelves for visibility
This project is perfect for adding a personal touch to your home decor. Plus, it’s a great way to unwind and get creative!
12. Personalized Name Bottles

Personalized name bottles add a charming touch to your decor. Imagine a vibrant base color like teal or mustard yellow, with crisp white lettering showcasing names or initials. You can even try trendy pastels for a soft look. Stencils can help you paint neat letters, especially if you’re not confident in your freehand skills. Pinterest is buzzing with these ideas, and they truly elevate any space.
These customized bottles aren’t just for show; they make fantastic gifts too! Picture a wedding where each guest receives a bottle with their name on it, sitting elegantly at their table. You can pair each bottle with a delicate flower or a scented candle to make it even more special. This thoughtful touch makes your events feel personal and memorable.
Here are some practical tips to get started:
Use bold colors for a striking effect.
Choose trendy fonts to match your style.
Pick small bottles for table settings or larger ones for centerpieces.
Add decorative elements like twine or beads for extra flair.
Whether you’re decorating your home or planning a special event, personalized name bottles are a simple yet beautiful way to express creativity. You’ll love how they bring warmth and personality to your space, making it feel uniquely yours. Enjoy the process, and let your imagination flow!
Personalized Name Bottles
Editor’s Choice
Acrylic Paint Set, 24 Colors (2 oz/Bottle) with 12 Art Brushes, Art Supp…

2 Pack – 2 Inch Letter Stencils Set, 72 Reusable Stencils for Painting O…
PerkHomy Natural Jute Twine 600 Feet Long Twine String for Crafts Gift W…
13. Seasonal Theme Bottles

Bring life to your home with seasonal theme bottles! This craft lets you express the unique beauty of each season right in your living space. For autumn, imagine deep oranges and rich browns swirling around leaf designs. In winter, think soft whites and icy blues adorned with delicate snowflakes. As spring arrives, fill your bottles with pastel colors and cheerful flowers. When summer rolls in, let bright colors and beachy motifs take center stage. Pinterest is buzzing with these creative ideas, making it a trendy choice for home decor.
To make this project easy and fun, consider these practical tips. Start by setting up a simple storage system for your seasonal designs. This way, you can easily switch them out when the seasons change. Opt for removable paint so you can adjust your themes without hassle. Mixing colors can also help during transitional months, like when winter fades into spring. With this approach, your home will always feel fresh and inviting, perfect for any occasion.
• Create a dedicated storage box for seasonal bottles
• Use removable paint for easy theme changes
• Pick colors that blend for transitional seasons
• Place themed bottles in high-traffic areas for visibility
14. Inspirational Quote Bottles

Brighten your space with inspirational quote bottles that share your favorite sayings. These painted bottles can fill your home with positivity and motivation. Imagine a cheerful yellow bottle with “You got this!” in bold letters on your desk. Or a calming blue one that reads “Believe in yourself” beside your bed. Each bottle acts as a daily boost, inspiring you as you go about your day.
Mix and match different colors and quotes to create a set that truly reflects your personality. Pinterest abounds with ideas for these charming decorations, showing how they can enhance your home decor while keeping you motivated.
To make your own inspirational quote bottles, start with a clean glass or plastic bottle. Choose a base color that fits your style, like soft pastels or bright hues. Use acrylic paint for the lettering, applying it with a fine brush for those delicate details. If you’re on a budget, thrift stores often have affordable bottles waiting for a little creative touch.
These quote bottles not only brighten your space but also serve as thoughtful gifts. Imagine giving a friend a bottle with a quote that resonates with them. It’s a personal touch that can make a difference in their day.
• Choose a base color that matches your decor
• Use a fine brush for precise lettering
• Mix different fonts for a fun look
• Add decorative elements like twinkling fairy lights or small plants
With these simple steps, you can create beautiful, uplifting pieces that make your space feel more inviting and personal. So grab your paint and start spreading positivity today!
Inspirational Quote Bottles
Editor’s Choice
Acrylic Paint Set, 24 Colors (2 oz/Bottle) with 12 Art Brushes, Art Supp…

Anezus Tiny Detail Paint Brushes 30 Pcs Fine Paint Brushes Set with 3 Si…

Assorted Clear Glass Bottles with Corks, 6 Pack, 2.5in X 9in, 16oz
15. Multi-Layered Textures

Bring your bottle art to life with multi-layered textures! This technique transforms ordinary bottles into stunning decor pieces. Start by applying a solid base coat in your favorite color. Then, grab acrylic mediums like modeling paste or thicker paints to add dimension. You can create effects that mimic sandy shores, aged wood, or even a sparkling finish that catches the light. These textured bottles are not only beautiful but also align with popular DIY trends you see on platforms like Pinterest.
To get started, gather your materials and don’t hesitate to experiment. You can use palette knives, sponges, or even old credit cards to apply your textures. If you’re on a budget, look for leftover paints or inexpensive mediums at craft stores. This technique not only enhances your home decor but also allows you to express your creativity. Imagine how warm and inviting your space will feel with these unique, textured bottles showcased on your shelves or tables.
• Use different tools like sponges or brushes for unique effects.
• Choose contrasting colors to make textures stand out.
• Pick a clear coat to seal and protect your artwork.
• Add layers for an eye-catching, dimensional look.
16. Vintage-inspired Bottles

Transform your space with vintage-inspired painted bottles that add a touch of old-world charm. These bottles evoke nostalgia, making your home feel warm and inviting. Choose soft, muted colors like dusty pinks or gentle blues to create that classic look. A distressed finish enhances their character, making them perfect for rustic decor. You can even place them alongside antique books or old frames for an eclectic display that tells a story.
To get started, gather some empty bottles and acrylic paints in your chosen colors. Lightly sand the edges after painting to give them a weathered appearance. This technique is budget-friendly and allows you to personalize each piece. Consider using matte or satin finishes to deepen that vintage effect. Aim for a display that feels curated and unique, making your home feel like a cozy retreat.
• Choose soft pastels or muted shades for a vintage vibe
• Lightly sand edges after painting for a distressed look
• Pair with antique finds for an eclectic touch
• Use lace or burlap for added texture and authenticity
This project is not just about decoration; it’s about creating a space that reflects your personality. Vintage-inspired bottles can be the perfect conversation starters, bringing a sense of history and charm into your home. Enjoy the process and let your creativity shine!
17. Tie-Dye Bottles

Unleash your creativity with tie-dye painted bottles! This playful art form swirls colors together, creating unique, eye-catching designs. Start by painting your bottle with a white base coat. Once it dries, grab a squeeze bottle or a brush and add your favorite colors in swirling patterns. Picture vibrant blues, sunny yellows, and fiery reds dancing together in a psychedelic masterpiece. These bottles can transport you back to the groovy ’60s. Use them as charming vases or striking centerpieces for your next gathering. Pinterest is all abuzz with these colorful creations!
Ready to dive in? Here are some practical tips to help you achieve that perfect tie-dye effect. First, don’t be afraid to mix different shades for a bolder look. Keep it budget-friendly by using leftover acrylic paints from previous projects. If you want a softer appearance, dab off excess paint with an old towel. Finally, seal your masterpiece with a glossy finish to make those colors pop! These bottles will not only enhance your decor but also spark joy and conversation.
• Choose bright colors for a fun, vibrant look
• Use squeeze bottles for easy swirling techniques
• Seal with a gloss finish for added shine
• Place on tables or shelves for instant decor upgrades
18. Artistic Drip Paint Bottles

Transform ordinary bottles into stunning drip art that captures attention. This fun technique allows acrylic paint to flow down the sides, creating a unique masterpiece. Start with a bold, dark base color, then let bright, vibrant hues drip over it. You can even experiment with different color combinations to match your home decor. As seen on creative platforms like Pinterest, these artistic bottles are perfect for adding a splash of color to any room.
Getting started with drip painting is simple and budget-friendly. Grab some squeeze bottles for easy control over the paint drips. You don’t need to worry about being precise—just let your creativity run wild! Allow each layer to dry completely before adding more color. If you’re feeling adventurous, try using neon paints for a lively effect. These drip-painted bottles can become stunning centerpieces or accents on shelves, making your space feel inviting and personal.
• Use squeeze bottles for precise dripping control
• Choose contrasting colors for eye-catching designs
• Allow layers to dry fully for best results
• Pick neon or metallic paints for a vibrant look
Artistic drip paint bottles are not just easy to make; they also express your personality and style. With just a few supplies and a little time, you can create beautiful decor that tells your story. Whether you want a bold statement piece or a subtle accent, drip art can fit perfectly into your home.
19. Celestial Inspired Bottles

Capture the magic of the night sky with celestial-inspired painted bottles! These unique decor pieces can bring a sense of wonder into any room. Picture using deep blues, rich purples, and shimmering golds to depict stars, moons, and planets. Start with a bold black base coat to make your designs pop. Then, let your creativity shine as you use sponges or brushes to create your celestial patterns. This trendy decor style is perfect for adding a touch of whimsy to your home.
Once your bottles are complete, use fairy lights to illuminate them. This gives a dreamy glow, making them ideal for creating a cozy nighttime atmosphere. Imagine these lovely bottles placed on your bedside table or hung in a child’s room, sparking joy and imagination. They’re not just decorative; they can transform any space into a tranquil oasis.
Ready to get started? Here are some practical tips to help you along the way:
Choose colors like navy blue, deep purple, and gold for a cosmic feel.
Use sponges for soft star patterns and brushes for detailed designs.
Add glitter to your paint for extra sparkle and magic.
Place your bottles near light sources for a glowing effect, especially at night.
With these ideas, you’ll create stunning celestial bottles that not only look great but also bring a sense of calm and wonder to your home. Get ready to impress your guests and enjoy the beauty of the universe right in your living space!
Transform ordinary bottles into celestial wonders! With deep blues and shimmering golds, you can bring the magic of the night sky into your home decor. Let your creativity shine and watch your space come alive!
Celestial Inspired Bottles
Editor’s Choice

Artkey Acrylic Paint Set – 24 colors 2 oz/59 ml Acrylic Paints Professio…
Brightown 12 Pack LED Fairy Lights Battery Operated String Lights – 7ft …
24 Pcs Foam Paint Brushes, Wood Handle Sponge Brushes for Painting, Stai…
20. Color Block Bottles

Bring a splash of modern flair to your home with color block bottles! This trendy decor style combines bold colors with clean lines to create eye-catching pieces. Imagine a bottle painted in deep navy, paired with bright yellow and soft mint green. This mix not only brightens up a room but also showcases your unique style, much like the popular designs you see on Pinterest.
To create your own color block bottles, start by gathering a few glass bottles of different shapes and sizes. Choose a color scheme that resonates with you—think warm tones for a cozy feel or cool shades for a calm vibe. Using painter’s tape, section off areas of the bottle where you want to apply different colors. Once taped, fill in each section with your chosen hues, letting each layer dry before moving on. This method is simple and lets your creativity shine!
Here are some practical tips to kickstart your color blocking project:
Use painter’s tape for sharp lines and clean edges.
Choose a mix of matte and glossy finishes for depth.
Pick complementary colors to enhance contrast and interest.
Group multiple bottles together for a bold centerpiece.
With color block bottles, you can easily add personality to your decor while keeping costs low. This project is perfect for brightening up shelves, coffee tables, or even outdoor spaces, making your home feel lively and inviting.
Color Block Bottles
Editor’s Choice

4 Rolls Premium Painters Tape, Blue Tape, Masking Tape, Paint Tape for M…
Mfacoy Set of 6 Glass Bottles, 12 oz Clear Liquor Bottles, Heavy Base Gl…
21. Artistic Collage Bottles

Create stunning artistic collage bottles that tell your story! This DIY project lets you mix materials like paper, fabric, and paint to craft something truly unique. Imagine a bottle covered in colorful fabric swatches or vintage book pages, combining textures and colors that reflect your personality. This trendy decor idea has been popping up on Pinterest, inspiring many to showcase their creativity at home.
To start, paint your bottle in a color you love. Once it dries, grab your glue and begin adding your collage pieces. Don’t worry about perfection; the beauty lies in the mix! You can find materials around your home or at thrift stores, making this project budget-friendly. By using themed items—like travel postcards or nature-inspired paper—you can create a cohesive look that feels intentional yet personal. These bottles not only serve as decor but also spark conversations in your space!
• Use fabric scraps for a soft, textured look.
• Choose vibrant colors to make the bottle pop.
• Pick themed papers that reflect your interests.
• Seal your work with a clear coat to protect it.
With these tips, you can create collage bottles that are not just decor but a personal touch to your home. Enjoy the process, and let your creativity shine!
Artistic Collage Bottles
Editor’s Choice

AUEAR, 35 Pack Cotton Print Fabric Bundle Squares 9.8″x9.8″ Quilting Sew…
22. Marbled Bottles

Unleash your creativity with marbled bottles! This fun technique brings a swirl of colors to your home decor, giving each bottle a one-of-a-kind finish. Picture vibrant hues blending together, creating a stunning visual effect that catches the eye. Use shades that complement your space, like deep blues and soft whites for a coastal vibe or warm reds and oranges for a cozy autumn feel. Pinterest is buzzing with these marbled designs, making them a trendy choice for your next DIY project.
Ready to dive in? Start by gathering your materials. You’ll need acrylic paints in several colors and a shallow container for mixing. Pour the paints into the container and gently swirl them together. Next, dip your bottle into the mixture, letting it soak up the colors. For best results, use water-based acrylics, as they clean up easily and dry quickly. This project is budget-friendly and a great way to add personality to your home. Plus, each bottle tells its own story, making your space feel even more inviting.
• Use water-based acrylics for easy cleanup.
• Choose a mix of colors that complement your decor.
• Dip carefully to avoid drips and uneven coverage.
• Let dry completely before displaying for best results.
With marbled bottles, you can create stunning decor that showcases your unique style. Whether you use them as centerpieces or wall accents, they add a splash of creativity to any room. Enjoy the process, and watch your artistic vision come to life!
23. Tacky Glue Painted Bottles

Get ready to add a playful twist to your home decor with tacky glue painted bottles! This fun technique helps you create unique textures that will stand out in any room. Start by painting your bottle with a base color. Once it dries, grab some tacky glue and use it to draw patterns or write words on the surface. After the glue has dried, paint over it with a contrasting color. The result? A beautiful raised texture that adds depth and interest to your decor.
This style is perfect for personalizing gifts or setting a theme for your home. Imagine a collection of bottles, each with a different design, bringing personality to your space. Pinterest is buzzing with ideas for this trend, helping you stay inspired and creative.
To get started, you don’t need to break the bank. Tacky glue is affordable and easy to find at craft stores. You can experiment with different designs, from simple swirls to intricate shapes. Consider matching your bottle colors to your home’s color scheme for a cohesive look.
The raised textures you create will make your decor feel inviting and warm, making it perfect for gatherings or just for your own enjoyment.
• Use tacky glue to create fun patterns and designs
• Choose contrasting colors for a striking effect
• Pick bottles in various shapes and sizes for variety
• Add a clear coat finish for a polished look
Dive into this creative project and let your imagination run wild! Your painted bottles will not only beautify your space but also spark conversation and admiration from guests. Happy crafting!
Unleash your creativity with tacky glue painted bottles! This fun method lets you personalize your decor, transforming ordinary glass into textured works of art. Your home deserves a splash of unique charm!
Tacky Glue Painted Bottles
Editor’s Choice

Krylon Gallery Series Artist & Clear Coatings Aerosol, 11-Ounce, UV-Resi…
24. Memory Jars with Painted Bottles

Turn your painted bottles into charming memory jars! These delightful creations aren’t just decor; they’re a way to hold onto your favorite moments. Choose vibrant colors and unique designs to make each bottle special. Fill them with notes, photos, or small keepsakes that remind you of joyful times. Whether it’s a birthday, a trip, or a simple day that made you smile, these jars help you treasure those memories forever.
This project is a heartfelt gift idea too. Imagine giving someone a jar filled with shared memories or positive affirmations. It adds a personal touch that store-bought gifts often lack.
To get started, think about using different bottle shapes and sizes for added interest. You can find these at thrift stores or even in your own kitchen. For an eye-catching look, use transparent bottles to showcase the contents inside. Don’t forget to decorate the bottle cap; a touch of paint or embellishments can make a big difference.
This DIY decor aligns perfectly with the trend of creating personalized home spaces. It not only looks great but also brings warmth and character to your home.
Here are some tips to make your memory jars shine:
Use various bottle sizes for dynamic displays.
Choose bright, contrasting colors to make your designs pop.
Add fairy lights inside for a magical glow at night.
Place your jars on shelves or tables where they can be admired.
Making memory jars is a simple and rewarding project. They can bring joy to your space and serve as a reminder of life’s beautiful moments. Start painting today and create something that tells your story!
Memory Jars with Painted Bottles
Editor’s Choice
Acrylic Paint Set, 24 Colors (2 oz/Bottle) with 12 Art Brushes, Art Supp…

3 Packs Glass Water Bottles with Lid Clear Juice Bottles Reusable Bottle…

20 Pack LED Fairy Lights Battery Operated,3 Features Blinking Slowly Bli…
25. Upcycled Bottle Candle Holders

Transform your painted bottles into stylish candle holders that bring warmth and charm to your space! After decorating your bottles, simply cut the top if needed and insert a candle. The colorful paint will reflect the light beautifully, setting a cozy mood in any room or outdoor area. Trendy designs, like those seen on Pinterest, showcase how these candle holders can elevate your decor.
Imagine using a tall, slender bottle in a bold red hue paired with a soft white candle. Or, opt for a cluster of smaller, painted bottles in pastel shades to create a charming centerpiece. These little touches can make a big impact, adding personality and flair to your home.
To get started, gather some bottles from your recycling bin or thrift store. This DIY project is budget-friendly and perfect for beginners. Just remember to choose paint that works well on glass and is safe for indoor use. You can also use LED candles to avoid any fire hazards. The warm glow from your candles will create an inviting atmosphere, making your home feel more welcoming.
• Use LED candles for a safe, practical option
• Choose colors that match your decor for a cohesive look
• Group different bottle shapes for visual interest
• Add decorative elements like twine or lace for extra charm
Transform your painted bottles into candle holders and let their vibrant colors dance with the light! Illuminate your home with handmade decor that speaks to your style and warms your heart.
Upcycled Bottle Candle Holders
Editor’s Choice

Homemory 12Pcs Flickering Flameless Candle Battery Operated, 200+Hours F…
Acrylic Paint Set, 24 Colors (2 oz/Bottle) with 12 Art Brushes, Art Supp…
PerkHomy Natural Jute Twine 600 Feet Long Twine String for Crafts Gift W…
Conclusion

Crafting with upcycled bottles not only brings charm to your home but also gives new life to otherwise forgotten glass! Each painting idea shared here offers a chance to express your creativity while making delightful decor pieces.
So, gather your acrylics, some old bottles, and get ready to transform your space with handmade beauty that tells your story. Join in on the fun and let your decor reflect your unique style!
Note: We aim to provide accurate product links, but some may occasionally expire or become unavailable. If this happens, please search directly on Amazon for the product or a suitable alternative.
This post contains Amazon affiliate links, meaning I may earn a small commission if you purchase through my links, at no extra cost to you.
Frequently Asked Questions
What Are Some Easy Acrylic Painting Techniques For Beginners?
If you’re new to acrylics, don’t worry! There are plenty of easy techniques to get you started on your bottle painting journey. Techniques like dry brushing, sponging, and color blending can add depth and texture to your designs.
Start with simple patterns or gradients on your bottles, and as you gain confidence, experiment with more complex techniques like stenciling or layering. Remember, practice makes perfect, and the most important thing is to have fun!
Can I Use Any Type of Glass Bottle for Painting?
Absolutely! You can use almost any type of glass bottle for your painting projects. Whether it’s a wine bottle, soda bottle, or even a mason jar, they all make fantastic canvases for your upcycled bottle crafts.
Just be sure to clean your bottles thoroughly and remove any labels before you start painting. This ensures that your acrylic paint adheres well and gives you a beautiful finish for your handmade home decor.
How Do I Prepare My Bottles Before Painting?
Preparing your bottles before painting is key to achieving a great result! Start by washing your bottles with warm soapy water to remove any dirt or residue. Once cleaned, dry them completely.
If you want to ensure better paint adhesion, consider lightly sanding the surface with fine-grit sandpaper. This step isn’t necessary for all projects, but it can help the paint stick better and enhance the durability of your handmade decor.
What Are Some Creative Painting Ideas for Upcycled Bottles?
There are so many creative painting ideas for upcycled bottles! You could try painting a beautiful floral design for a spring theme, or go for a rustic look with earth tones and textured finishes.
Consider using stencils to create geometric patterns or even abstract art. You can also mix and match colors to create a gradient effect or use metallic paints for a touch of glamour. Let your imagination run wild!
How Do I Seal My Painted Bottles for Long-Lasting Use?
To make sure your painted bottles stand the test of time, sealing them is a must! After your paint has completely dried, apply a clear acrylic sealer or topcoat.
This will protect your artwork from scratches and fading while making it easier to clean. Just be sure to choose a sealer that’s suitable for your specific paint and intended use, especially if your bottles will be exposed to moisture or sunlight.
Related Topics
bottle painting
acrylic techniques
upcycled decor
handmade crafts
DIY home decor
creative painting
easy projects
vintage style
seasonal decor
budget friendly
home accents
beginner friendly